على طريقة React
قد يغير React من الطريقة التي ترى بها التصاميم أو تبني بها التطبيقات. عندما تقوم ببناء واجهة للمستخدم بـ React سيتوجب عليك أولا أن تفصلها لأجزاء تدعى مكونات. بعد ذلك، تقوم بوصف الحالات الظاهرية المختلفة لكل مكون على حدته. وأخيرا، تقوم بربط مكوناتك معا كي تسري البيانات خلالها بانسيابية. في هذا الدرس، سنخوض معك في عملية التفكير في بناء جدول بيانات لمنتجات، مع إمكانية البحث فيه.
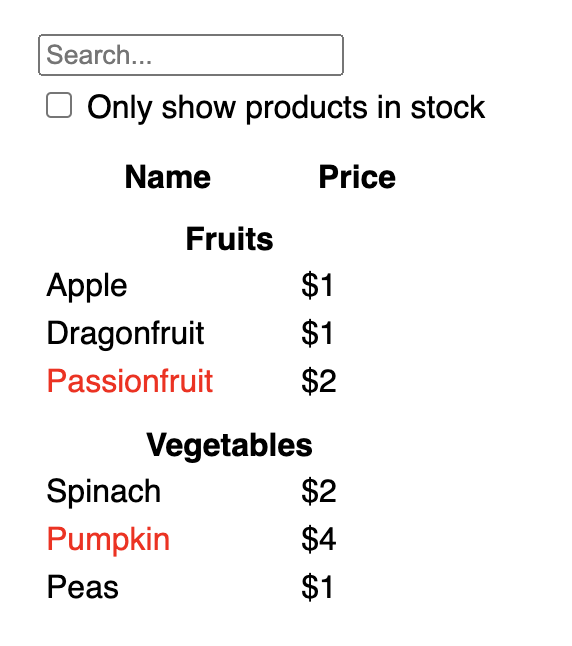
ابدأ بالنموذج التقريبي
لنفرض أن لديك واجهة برمجة لـ JSON ونموذج تقريبي من أحد المصممين.
واجهة JSON البرمجية أعطتك البيانات التالية:
[
  { category: "Fruits", price: "$1", stocked: true, name: "Apple" },
  { category: "Fruits", price: "$1", stocked: true, name: "Dragonfruit" },
  { category: "Fruits", price: "$2", stocked: false, name: "Passionfruit" },
  { category: "Vegetables", price: "$2", stocked: true, name: "Spinach" },
  { category: "Vegetables", price: "$4", stocked: false, name: "Pumpkin" },
  { category: "Vegetables", price: "$1", stocked: true, name: "Peas" }
]
والنموذج التقريبي يبدو هكذا:
لتنفيذ واجهة مستخدم في React، ستسير عادة على نفس الخطوات الخمس التالية:
الخطوة 1: قسم الواجهة إلى شجرة من المكونات
ابدأ برسم مربعات حول كل من المكونات ومكوناتها الفرعية في النموذج التقريبي، وقم بتسمية كل منها. إذا كنت تعمل مع مصمم، فلربما تجده قد قام بتسميتها بالفعل في البرامج التي يستخدمها، اسأله أولا!
قد تختلف طريقة التفكير في تقسيم التصميم لمكونات بناء على خلفيتك المهنية إلى عدة طرق؛ من حيث:
- البرمجة—استخدم نفس الطرائق لتقرر إذا ما كان عليك إنشاء دالة (function) أو كائن. إحدى الطرائق المقصودة هي مبدأ المهمة الواحدة، والتي تشير إلى أنه في أحسن الأحوال، يكون للمكون الواحد وظيفة واحدة فقط. وكلما زادت مهمات المكون، يجب تقسيمها لمكونات فرعية أصغر.
- التنسيق (CSS)—فكر فيما ستقوم بتخصيص أسماء تصنيفات (classes) له. (مع أن المكونات أصلا يفترض أنها صغيرة الحجم).
- التصميم—فكر كيف ستقوم بترتيب تراص طبقات التصميم.
إذا كان الـJSON الذي تستخدمه مهيأ بشكل جيد، فكثيرا ما ستجده يطابق وصفك وتقسيمك لمكونات واجهتك بكل سلاسة. ذلك أن واجهة المستخدم ونماذج البيانات عادة ما يكون لهما نفس بنية المعلومات. بمعنى آخر، لهما نفس الشكل. فقسم واجهتك إلى مكونات، حيث يتماشى كل مكون مع إحدى أجزاء نموذج البيانات.
يوجد في هذه الصورة خمس مكونات:

FilterableProductTable(باللون الرمادي - جدول منتجات قابل للبحث) يحوي البرنامج بالكامل.SearchBar(بالأزرق - مربع بحث) حيث يكتب فيه المستخدم.ProductTable(بالبنفسجي - جدول المنتجات) يعرض المنتجات ونتائج البحث فيها بحسب مدخلات المستخدم.ProductCategoryRow(بالأخضر - سطر خاص بنوع المنتج) يعرض عنوان لكل نوع من المنتجات.ProductRow(بالأصفر - سطر المنتج) يعرض سطرا لكل منتج.
إذا ألقيت نظرة على جدول المنتجات (ProductTable - بالبنفسجي) ستجد أن رأس الجدول (الذي يحوي خانات “الاسم - Name” و”السعر - Price”) ليس كائنا مستقلا بذاته. هذه مسألة تفضيل شخصي، حيث بإمكانك اتخاذ أي مسلك بين الاثنين. في هذا المثال هي جزء من مكون جدول المنتجات، لإنه يظهر داخل قائمة جدول المنتجات. على كل حال، إذا زادت مهام رأس الجدول تعقيدا (كأن تضيف لها خيار الترتيب) يمكنك حينها أن تنشئ له مكونا خاصا به، وليكن ProductTableHeader (رأس جدول المنتجات).
والآن بعد أن حددت مكونات النموذج التقريبي، قم بترتيبهم في شجرة تسلسلية؛ بحيث أن المكونات التي تظهر داخل مكونات أخرى في النموذج التقريبي يجب أن تبدو كفروع في الشجرة:
FilterableProductTableSearchBarProductTableProductCategoryRowProductRow
الخطوة 2: قم ببناء نموذج مصمت بـ React
والآن بما أن لديك تقسيما متسلسلا للمكونات، حان الوقت لنبدأ التنفيذ. أكثر الطرق مباشرة؛ أن تبني نموذجا يعرض واجهة المستخدم من نموذج بياناتك، دون إضافة أي تفاعل… هذا بغض النظر عن أنه من الأيسر غالبا أن تبني النموذج المصمت أولا ثم تقوم لاحقا بإضافة إمكانية التفاعل عليه! بناء نموذج مصمت يتطلب الكثير من الكتابة دون أن تستلزم أي تفكير. بخلاف إضافة التفاعليات، التي تتطلب الكثير من التفكير وقدرًا أقل من الكتابة.
لبناء نموذج مصمت من تطبيقك يقوم بعرض البيانات المطلوبة، سيكون عليك بناء مكونات توظف مكونات أخرى، وتمرر البيانات إليها باستخدام الخصائص. الخصائص هي إحدى طرق تمرير البيانات من مكون لمكون فرعي داخله (إذا كان مبدأ الحالات مألوفا لديك، فلا تستخدم الحالات مطلقا لبناء النسخة المصمتة. الحالات مخصصة أصلا للتفاعلات، ونعني بذلك البيانات التي تتغير بمرور الوقت. وبما أن هذا نموذج مصمت من التطبيق، فلا يفترض أننا نحتاجه).
يمكنك إما بناء التطبيق “من أعلاه لأسفله”؛ بالبدء ببناء المكونات الأعلى في الشجرة التسلسلية (كأن تبدأ بـFilterableProductTable)، أو “من أسفله لأعلاه”؛ بأن تبدأ بالمكونات الدنيا (مثل ProductRow). إذا كان لدينا مثال أبسط من هذا، سيكون من الأيسرأن تبدأ من الأعلى لأسفل، أما في المشاريع الكبرى، عادة ما يكون من الأيسر أن نبدأ من الأدنى للأعلى.
function ProductCategoryRow({ category }) {
  return (
    <tr>
      <th colSpan="2">
        {category}
      </th>
    </tr>
  );
}

function ProductRow({ product }) {
  const name = product.stocked ? product.name :
    <span style={{ color: 'red' }}>
      {product.name}
    </span>;

  return (
    <tr>
      <td>{name}</td>
      <td>{product.price}</td>
    </tr>
  );
}

function ProductTable({ products }) {
  const rows = [];
  let lastCategory = null;

  products.forEach((product) => {
    if (product.category !== lastCategory) {
      rows.push(
        <ProductCategoryRow
          category={product.category}
          key={product.category} />
      );
    }
    rows.push(
      <ProductRow
        product={product}
        key={product.name} />
    );
    lastCategory = product.category;
  });

  return (
    <table>
      <thead>
        <tr>
          <th>Name</th>
          <th>Price</th>
        </tr>
      </thead>
      <tbody>{rows}</tbody>
    </table>
  );
}

function SearchBar() {
  return (
    <form>
      <input type="text" placeholder="Search..." />
      <label>
        <input type="checkbox" />
        {' '}
        Only show products in stock
      </label>
    </form>
  );
}

function FilterableProductTable({ products }) {
  return (
    <div>
      <SearchBar />
      <ProductTable products={products} />
    </div>
  );
}

const PRODUCTS = [
  {category: "Fruits", price: "$1", stocked: true, name: "Apple"},
  {category: "Fruits", price: "$1", stocked: true, name: "Dragonfruit"},
  {category: "Fruits", price: "$2", stocked: false, name: "Passionfruit"},
  {category: "Vegetables", price: "$2", stocked: true, name: "Spinach"},
  {category: "Vegetables", price: "$4", stocked: false, name: "Pumpkin"},
  {category: "Vegetables", price: "$1", stocked: true, name: "Peas"}
];

export default function App() {
  return <FilterableProductTable products={PRODUCTS} />;
}
(إذا شعرت بالقلق بسبب الكود السابق, قم بمراجعة قسم البداية السريعة أولا!)
بعد بنائك لمكوناتك، أصبح لديك مكتبة من المكونات القابلة لإعادة الاستخدام التي تقوم بعرض أنموذج بياناتك. وبما أن هذا تطبيق مصمت، فمخرجات المكونات ستكون مجرد JSX. المكون الأعلى في التسلسل الشجري (FilterableProductTable) سيتلقى أنموذج البيانات كإحدى خصائصه. يدعى هذا بـ سيل البيانات في اتجاه واحد لأن البيانات تسري لأسفل قادمة من مكون أعلى في التسلسل الشجري إلى مكونات دنيا في التسلسل.
الخطوة 3: حدد أبسط وأكمل تمثيل لحالات واجهة المستخدم
لجعل الواجهة تفاعلية؛ يجب أن تسمح للمستخدم بتعديل أنموذج بياناتك. لإنجاز ذلك، سيتعين عليك توظيف الحالات.
اعتبر الحالات كما لو أنها عدّتك من البيانات المتغيرة التي يجب أن يتذكرها تطبيقك. أهم مبدأ يجب أخذه في الاعتبار عند تحديد حالاتك هي أن تكون فريدة. حاول استنباط القدر الأدنى لتمثيل حالات تطبيقك المختلفة التي سيحتاجها، وقم باحتساب أي حالة أخرى تزيد على ذلك عند الحاجة. مثلا، إذا كنت تقوم ببناء قائمة مشتريات، يمكنك حفظ الأصناف كمصفوفة في حالة التطبيق. أما إذا احتجت لعرض عدد الأصناف في القائمة، فلا تقم بحفظ عدد الأصناف كحالة أخرى. عوضا عن ذلك؛ يمكنك دائما قراءة طول المصفوفة.
الآن فكر في كل ما قد تحتاجه من بيانات في تطبيقنا المفترض:
- القائمة الأصلية للمنتجات.
- كلمات البحث التي قام المستخدم بكتابتها.
- حالة مربع الاختيار (الخاص بإظهار المنتجات التي لها رصيد فقط).
- قائمة المنتجات بعد التصفية بكلمات البحث.
أيا مما سبق يعتبر حالة؟ يمكنك تمييزها بأنها لا تنطبق عليها المواصفات التالية:
- هل تبقى دائما ثابتة لا تتغير؟ إذا ليست حالة..
- هل تم تمريرها من المكون الأب عن طريق الخصائص؟ إذا ليست حالة.
- هل يمكن اشتقاقها من حالة أخرى أو إحدى خصاص المكون؟ إذا ليست حالة!
كل ما تبقى فهو غالبا يمكن وصفه بأنه حالة.
لنقم بمراجعتهم واحد تلو الآخر مرة أخرى:
- القائمة الأصلية للمنتجات يتم تمريرها ضمن الخصائص،فهي ليست حالة.
- كلمات البحث تبدو كحالة بما أنها تتغير مع مرور الوقت ولا يمكن اشتقاقها من أي شيء آخر.
- حالة مربع الاختيار تبدو كحالة بما أنها تتغير مع مرور الوقت ولا يمكن اشتقاقها من أي شيء آخر.
- قائمة المنتجات بعد التصفية ليست حالة إذ يمكن اشتقاقها عبر تصفية قائمة المنتجات الأصلية وفقا لكلمات البحث وحالة مربع الاختيار.
This means only the search text and the value of the checkbox are state! Nicely done! هذا يعني أن كلمات البحث وحالة مربع الاختيار فقط هما ما يعتبران حالات محتملة للتطبيق! أحسنت عملا!
Deep Dive
There are two types of “model” data in React: props and state. The two are very different: يعتبر كل منهما من أحد أنواع البيانات “النموذجية” في React: الخصائص والحالة. يختلف كلاهما عن الآخر بفارق كبير:
- الخصائص (Props) تشبه المعطيات التي تقوم بتمريرها لإحدى الدوال. تتيح لمكون أعلى أن تمرر بيانات لمكون تابع له وتنسيق مظهره أيضا. فمثلا، مكون
Formيمكن أن يمرر خاصيةcolorإلىButtonلتغيير لونه. - الحالة (State) تشبه ذاكرة المكون. تتيح للمكون إمكانية أن يحاقظ على اطلاعه على بعض البيانات وأن يغيرها تجاوبا مع تفاعل المستخدم. فمثلا, يمكن للزر
Buttonأن يبقى على اطلاع لحالةisHovered.
الخصائص والحالات أمران مختلفان، لكن يكملان بعضهما. قد يحتوي مكون ما على بعض البيانات في حالات (كي يتمكن من تغييرها) و يمررها لمكون تابع كخصائص لها. لا بأس إن كنت تشعر أن الفارق بينهما لا يزال غامضا. قد يستلزم الأمر بعض الممارسة لتتمكن من الإلمام به!
Step 4: Identify where your state should live
After identifying your app’s minimal state data, you need to identify which component is responsible for changing this state, or owns the state. Remember: React uses one-way data flow, passing data down the component hierarchy from parent to child component. It may not be immediately clear which component should own what state. This can be challenging if you’re new to this concept, but you can figure it out by following these steps!
For each piece of state in your application:
- Identify every component that renders something based on that state.
- Find their closest common parent component—a component above them all in the hierarchy.
- Decide where the state should live:
- Often, you can put the state directly into their common parent.
- You can also put the state into some component above their common parent.
- If you can’t find a component where it makes sense to own the state, create a new component solely for holding the state and add it somewhere in the hierarchy above the common parent component.
In the previous step, you found two pieces of state in this application: the search input text, and the value of the checkbox. In this example, they always appear together, so it makes sense to put them into the same place.
Now let’s run through our strategy for them:
- Identify components that use state:
ProductTableneeds to filter the product list based on that state (search text and checkbox value).SearchBarneeds to display that state (search text and checkbox value).
- Find their common parent: The first parent component both components share is
FilterableProductTable. - Decide where the state lives: We’ll keep the filter text and checked state values in
FilterableProductTable.
So the state values will live in FilterableProductTable.
Add state to the component with the useState() Hook. Hooks are special functions that let you “hook into” React. Add two state variables at the top of FilterableProductTable and specify their initial state:
function FilterableProductTable({ products }) {
  const [filterText, setFilterText] = useState('');
  const [inStockOnly, setInStockOnly] = useState(false);
Then, pass filterText and inStockOnly to ProductTable and SearchBar as props:
<div>
  <SearchBar
    filterText={filterText}
    inStockOnly={inStockOnly} />
  <ProductTable
    products={products}
    filterText={filterText}
    inStockOnly={inStockOnly} />
</div>
You can start seeing how your application will behave. Edit the filterText initial value from useState('') to useState('fruit') in the sandbox code below. You’ll see both the search input text and the table update:
import { useState } from 'react';

function FilterableProductTable({ products }) {
  const [filterText, setFilterText] = useState('');
  const [inStockOnly, setInStockOnly] = useState(false);

  return (
    <div>
      <SearchBar
        filterText={filterText}
        inStockOnly={inStockOnly} />
      <ProductTable
        products={products}
        filterText={filterText}
        inStockOnly={inStockOnly} />
    </div>
  );
}

function ProductCategoryRow({ category }) {
  return (
    <tr>
      <th colSpan="2">
        {category}
      </th>
    </tr>
  );
}

function ProductRow({ product }) {
  const name = product.stocked ? product.name :
    <span style={{ color: 'red' }}>
      {product.name}
    </span>;

  return (
    <tr>
      <td>{name}</td>
      <td>{product.price}</td>
    </tr>
  );
}

function ProductTable({ products, filterText, inStockOnly }) {
  const rows = [];
  let lastCategory = null;

  products.forEach((product) => {
    if (
      product.name.toLowerCase().indexOf(
        filterText.toLowerCase()
      ) === -1
    ) {
      return;
    }
    if (inStockOnly && !product.stocked) {
      return;
    }
    if (product.category !== lastCategory) {
      rows.push(
        <ProductCategoryRow
          category={product.category}
          key={product.category} />
      );
    }
    rows.push(
      <ProductRow
        product={product}
        key={product.name} />
    );
    lastCategory = product.category;
  });

  return (
    <table>
      <thead>
        <tr>
          <th>Name</th>
          <th>Price</th>
        </tr>
      </thead>
      <tbody>{rows}</tbody>
    </table>
  );
}

function SearchBar({ filterText, inStockOnly }) {
  return (
    <form>
      <input
        type="text"
        value={filterText}
        placeholder="Search..."/>
      <label>
        <input
          type="checkbox"
          checked={inStockOnly} />
        {' '}
        Only show products in stock
      </label>
    </form>
  );
}

const PRODUCTS = [
  {category: "Fruits", price: "$1", stocked: true, name: "Apple"},
  {category: "Fruits", price: "$1", stocked: true, name: "Dragonfruit"},
  {category: "Fruits", price: "$2", stocked: false, name: "Passionfruit"},
  {category: "Vegetables", price: "$2", stocked: true, name: "Spinach"},
  {category: "Vegetables", price: "$4", stocked: false, name: "Pumpkin"},
  {category: "Vegetables", price: "$1", stocked: true, name: "Peas"}
];

export default function App() {
  return <FilterableProductTable products={PRODUCTS} />;
}
Notice that editing the form doesn’t work yet. There is a console error in the sandbox above explaining why:
In the sandbox above, ProductTable and SearchBar read the filterText and inStockOnly props to render the table, the input, and the checkbox. For example, here is how SearchBar populates the input value:
function SearchBar({ filterText, inStockOnly }) {
  return (
    <form>
      <input
        type="text"
        value={filterText}
        placeholder="Search..."/>
However, you haven’t added any code to respond to the user actions like typing yet. This will be your final step.
Step 5: Add inverse data flow
Currently your app renders correctly with props and state flowing down the hierarchy. But to change the state according to user input, you will need to support data flowing the other way: the form components deep in the hierarchy need to update the state in FilterableProductTable.
React makes this data flow explicit, but it requires a little more typing than two-way data binding. If you try to type or check the box in the example above, you’ll see that React ignores your input. This is intentional. By writing <input value={filterText} />, you’ve set the value prop of the input to always be equal to the filterText state passed in from FilterableProductTable. Since filterText state is never set, the input never changes.
You want to make it so whenever the user changes the form inputs, the state updates to reflect those changes. The state is owned by FilterableProductTable, so only it can call setFilterText and setInStockOnly. To let SearchBar update the FilterableProductTable’s state, you need to pass these functions down to SearchBar:
function FilterableProductTable({ products }) {
  const [filterText, setFilterText] = useState('');
  const [inStockOnly, setInStockOnly] = useState(false);

  return (
    <div>
      <SearchBar
        filterText={filterText}
        inStockOnly={inStockOnly}
        onFilterTextChange={setFilterText}
        onInStockOnlyChange={setInStockOnly} />
Inside the SearchBar, you will add the onChange event handlers and set the parent state from them:
<input
  type="text"
  value={filterText}
  placeholder="Search..."
  onChange={(e) => onFilterTextChange(e.target.value)} />
Now the application fully works!
import { useState } from 'react';

function FilterableProductTable({ products }) {
  const [filterText, setFilterText] = useState('');
  const [inStockOnly, setInStockOnly] = useState(false);

  return (
    <div>
      <SearchBar
        filterText={filterText}
        inStockOnly={inStockOnly}
        onFilterTextChange={setFilterText}
        onInStockOnlyChange={setInStockOnly} />
      <ProductTable
        products={products}
        filterText={filterText}
        inStockOnly={inStockOnly} />
    </div>
  );
}

function ProductCategoryRow({ category }) {
  return (
    <tr>
      <th colSpan="2">
        {category}
      </th>
    </tr>
  );
}

function ProductRow({ product }) {
  const name = product.stocked ? product.name :
    <span style={{ color: 'red' }}>
      {product.name}
    </span>;

  return (
    <tr>
      <td>{name}</td>
      <td>{product.price}</td>
    </tr>
  );
}

function ProductTable({ products, filterText, inStockOnly }) {
  const rows = [];
  let lastCategory = null;

  products.forEach((product) => {
    if (
      product.name.toLowerCase().indexOf(
        filterText.toLowerCase()
      ) === -1
    ) {
      return;
    }
    if (inStockOnly && !product.stocked) {
      return;
    }
    if (product.category !== lastCategory) {
      rows.push(
        <ProductCategoryRow
          category={product.category}
          key={product.category} />
      );
    }
    rows.push(
      <ProductRow
        product={product}
        key={product.name} />
    );
    lastCategory = product.category;
  });

  return (
    <table>
      <thead>
        <tr>
          <th>Name</th>
          <th>Price</th>
        </tr>
      </thead>
      <tbody>{rows}</tbody>
    </table>
  );
}

function SearchBar({
  filterText,
  inStockOnly,
  onFilterTextChange,
  onInStockOnlyChange
}) {
  return (
    <form>
      <input
        type="text"
        value={filterText} placeholder="Search..."
        onChange={(e) => onFilterTextChange(e.target.value)} />
      <label>
        <input
          type="checkbox"
          checked={inStockOnly}
          onChange={(e) => onInStockOnlyChange(e.target.checked)} />
        {' '}
        Only show products in stock
      </label>
    </form>
  );
}

const PRODUCTS = [
  {category: "Fruits", price: "$1", stocked: true, name: "Apple"},
  {category: "Fruits", price: "$1", stocked: true, name: "Dragonfruit"},
  {category: "Fruits", price: "$2", stocked: false, name: "Passionfruit"},
  {category: "Vegetables", price: "$2", stocked: true, name: "Spinach"},
  {category: "Vegetables", price: "$4", stocked: false, name: "Pumpkin"},
  {category: "Vegetables", price: "$1", stocked: true, name: "Peas"}
];

export default function App() {
  return <FilterableProductTable products={PRODUCTS} />;
}
You can learn all about handling events and updating state in the Adding Interactivity section.
Where to go from here
This was a very brief introduction to how to think about building components and applications with React. You can start a React project right now or dive deeper on all the syntax used in this tutorial.